 Maciej Ramus

The customer types into the form: alcove 247 cm wide, 262 cm high, sliding doors, mirror and white board. That is when a working day starts in the joinery workshop, one the customer never sees. The designer draws the wardrobe in Pro100 or Polboard, pulls the cut list out of the design, retypes it into a file for the board wholesaler or into the cutting optimiser, and only then does someone work out how many board sheets the order will take and whether the price quoted to the customer adds up at all.
This article is for the owner of a joinery workshop or a company making made-to-measure wardrobes and built-ins, or for a production manager who is considering a wardrobe configurator on the website or in a panel for sales reps. We show how a cut list is created from a few customer dimensions, how a configurator can prepare the panel cutting plan and the file for the panel saw or CNC by itself, and why a price calculated per square metre can drift from the real board consumption by as much as a third.
What happens between the customer's dimensions and the saw
In a typical furniture workshop, the path from enquiry to cutting looks like this:
- measurement and preliminary quote: the sales rep gives a price “per square metre” or from a module price list, often even before measuring,
- design: the designer draws the overall shape, splits it into modules, and places shelves, hanging rails and drawers,
- cut list: the design produces a parts list with dimensions, edge banding and grain direction,
- cutting optimisation: the list goes into software that nests the panels on board sheets, or to a board wholesaler that cuts to order,
- cutting and edge banding: panel saw or sliding table saw, then the edge bander,
- drilling: holes for connectors, hinges and shelves, by hand or on a CNC,
- installation at the customer's site.
Every handover between these steps means retyping by hand. The dimension from the form goes into an email, from the email into the design, from the design into Excel, from Excel into the wholesaler's software. A 10 mm error in a single panel only shows up during installation, when a shelf won't fit between the partitions. We have seen the same pattern at other manufacturing companies struggling with quoting chaos: what costs the most is not the design itself but moving data between people.
A configurator will not replace a designer on an unusual built-in with a sloping ceiling and three types of fronts. For repeatable products, however, such as a sliding-door alcove wardrobe, a modular walk-in wardrobe or a freestanding wardrobe, it can take over the whole middle of this path: from dimensions to the cut list and the cutting plan.
What a 240 × 260 × 60 cm wardrobe is made of
Take a freestanding wardrobe with a full carcass, sliding doors and only shelves inside. 18 mm melamine-faced chipboard, 3 mm HDF back panel, 8 cm plinth. This is its cut list for the board:
| Element | Qty | Finished size (mm) | Where it comes from |
|---|---|---|---|
| Side panel | 2 | 2600 × 500 | wardrobe height × carcass depth (60 cm minus approx. 10 cm for tracks and doors) |
| Top and bottom panel | 2 | 2364 × 500 | width minus two 18 mm side panels |
| Plinth | 1 | 2364 × 80 | same as the top/bottom panel, plinth height |
| Partition | 2 | 2484 × 500 | height minus the plinth and the top and bottom panels |
| Shelf | 18 | 774 × 480 | 3 modules with 6 shelves each, module width minus clearance, depth set back by 2 cm |
In total 25 panels, 14.32 m² of board and 31.2 running metres of 2 mm edge banding on the visible edges. The HDF back is a separate material: approx. 6.2 m², usually split into strips at the partitions, because a single 2400 × 2600 mm piece does not fit on a sheet.
The number of modules is no accident. An 18 mm shelf spanning more than approx. 80 cm starts to sag under clothes, which is why a 240 cm wardrobe has three modules of approx. 78 cm rather than two of 117 cm. This is one of the construction rules a configurator has to know before it calculates anything else.
Rules a wardrobe configurator has to know
A cut list is the result of rules, not of a drawing. If the rules are stored in the system, the panels recalculate themselves with every change of dimension. Below are the rules behind our made-to-measure 3D wardrobe configurator in the showroom, together with the values we adopted in it based on data from hardware and door system manufacturers:
| Rule | Value in the demo | What the configurator does |
|---|---|---|
| Maximum shelf span | 80 cm | splits the wardrobe into as many modules as needed so that none is wider |
| Sliding door leaf width | 50 to 150 cm | blocks any number of leaves that would make a leaf too narrow or too wide |
| Door leaf overlap | 3 cm | adds the overlap to the width of each leaf |
| Door leaf height in an aluminium frame | up to 275 cm | lowers the wardrobe and shows a message |
| Depth for sliding doors | Min.60cm | switches to hinged fronts at 45 cm |
| Depth for hangers | approx. 55 cm | in a 45 cm wardrobe, replaces hanging rails with shelves |
| Hinged board front | up to approx. 60 × 240 cm | splits the fronts and adds a row of top units |
| Concealed hinges | 2 up to 90 cm of front height, then one more every approx. 70 cm | counts the hinges for the parts breakdown |
| Pull-down wardrobe lift | from 445 mm internal width | selects the mechanism type for the module width or inserts a hanging rail |
Each of these rules changes the cut list. A fourth module means an extra partition and a few more shelves. Switching to hinged doors means different fronts, hinges and holes. That is why the panel generator has to live in the same place as the rules, not in a separate spreadsheet into which someone retypes the result.
Calculator: from dimensions to board sheets
Below is a simplified cut list generator with a cutting plan on 2800 × 2070 mm sheets. Change the width, height or board decor and see how the number of panels, sheets and board yield changes. You can download the list as a CSV file, in a layout similar to the one accepted by cutting optimisers and board wholesalers.
Calculator: a made-to-measure wardrobe broken down into panels and board sheets
Simplified construction of a sliding-door wardrobe: 18 mm board, 2800 × 2070 mm sheet, 10 mm edge trim, 4 mm saw kerf, modules up to 80 cm wide, 2 mm edge banding on visible edges. Example prices, net. The cutting plan is calculated by a simple strip algorithm; a professional optimiser will usually nest the panels a few percent tighter.
| Element | Qty | Finished size (mm) | 2 mm edge banding |
|---|
Enter 245 cm instead of 240 cm. The wardrobe is 5 cm wider, i.e. 2%, but a module would now be over 80 cm, so the configurator splits it into four modules. That adds a partition and six shelves, and the panels no longer fit on three sheets. Board priced per square metre goes up from PLN 739 to PLN 810, while board priced from the cutting plan goes up from PLN 780 to PLN 1,040. On a single wardrobe that is a PLN 230 difference that a “per square metre” quote does not see.
Now enter a height of 280 cm. The wardrobe side panel is 2800 mm, while the sheet is approx. 2780 mm after trimming the damaged edges. A wardrobe like that cannot be made from a single piece of board. A sales rep quoting per square metre will sell it without a problem, and the trouble only comes out in production.
Why the price per m² drifts from the cost of the board
Pricing per square metre assumes that the cost of board grows linearly with the size of the wardrobe. In reality, board is bought and cut in full sheets, and consumption depends on how the panels nest on the sheet. Three effects break the linearity:
- module jumps: a few centimetres of width can add a module, and with it a partition and a set of shelves,
- sheet jumps: panels that only just fail to fit on three sheets need a fourth one, half of which ends up as offcut,
- grain direction: with a woodgrain decor, panels cannot be rotated, because the grain has to run along the side panel or shelf. The optimiser has fewer nesting options and uses more board than with a solid colour.
On a single wardrobe the difference is anywhere from a few dozen to a few hundred PLN. Across a hundred orders a year, that is money the workshop gives away to customers without even knowing it. A configurator that calculates the cutting plan can price the board from full sheets, or at least warn the sales rep that a given configuration falls into an unfavourable jump.
This does not mean every quote has to show the customer the cost of sheets. A good compromise is a per-square-metre price for the customer and margin control based on the cutting plan in the company panel. Just as with matrix pricing for roller blinds, a mixed model works best: a simple price on the outside, the exact cost on the inside.
The customer's dimension is not yet a panel dimension
Most errors in automatically generated cut lists come from confusing three dimensions:
- alcove dimension: what the customer measured. Walls are rarely straight, so you measure at several points and take the smallest value,
- wardrobe dimension: the alcove dimension minus installation clearance. The gap at the wall is covered with a filler strip,
- panel dimension: the size of the part resulting from the construction, i.e. from board thickness, number of modules, joining method and edge banding.
On top of that there is the question of whether the list gives the finished size, after edge banding, or the cutting size. The difference is the thickness of the edge banding on each banded edge. Some optimisers and wholesalers accept the finished size with edge banding information and make the correction themselves, others expect the cutting size. The configurator has to know this for every recipient of the file, otherwise shelves will come out 2 or 4 mm too wide.
Export to production: what the file should contain
A cut list from a configurator only makes sense if it goes to production without retyping. In practice this means three types of export:
- CSV or XLSX for the cutting optimiser or board wholesaler: name, quantity, length, width, material and decor, edge banding on each of the four edges, grain direction, order number. The column layout is adapted to the software the workshop uses, e.g. Optimik, CutRite or Ardis, or to the wholesaler's order form,
- drilling data: holes for connectors, hinges and shelf supports in the 32 mm system, in the CNC machine's program format, e.g. woodWOP on Homag machines or bSolid on Biesse, or as a DXF drawing,
- panel labels: name, size, order and module number, ideally with a barcode, so that after cutting it is clear which part goes into which wardrobe.
Plus a hardware list: drawer runners, hinges, hanging rails, profiles and sliding door tracks. The configurator calculates them for the price anyway, so the purchase list is the same data set in a different view. We write more about how a configurator connects to supplier catalogues and CPQ in our article on quoting architecture in non-serial manufacturing.
A wardrobe configurator in practice
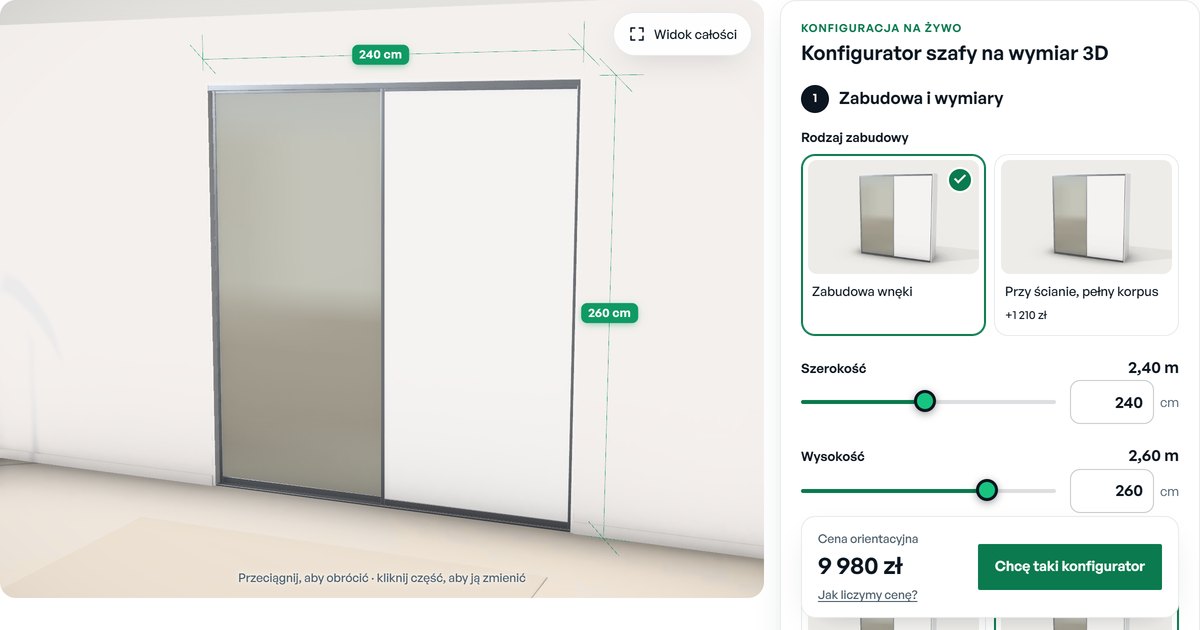
Our showroom features a made-to-measure 3D wardrobe configurator: built-in alcove wardrobe or full carcass, width in 1 cm steps, sliding or hinged doors, mirror, lacquered glass, veneer or board, with the interior laid out module by module. The rules from the table above work in it live. A 240 cm wardrobe gets three modules, at 45 cm depth the sliding doors switch to hinged ones, and the pull-down lift adjusts itself to the module width.
The price in the demo is calculated with a breakdown: carcass per m², fronts per m² with a multiplier for the infill, shelves, hanging rails, drawers and hardware per piece, installation as a percentage. The default 240 × 260 × 60 cm alcove wardrobe with a mirror and board costs PLN 9,980 in it, and a full carcass against a wall adds PLN 1,210. In an implementation for a manufacturer, the same set of parameters feeds the cut list generator and the cutting plan, i.e. what the calculator above shows.
Click to launch the configurator right here in the article. Prefer full screen?
Open the 3D wardrobe configurator in the showroom →
7 pitfalls of automatic cutting plans from a configurator
1. Finished size or cutting size
Described above: one list, two recipients, two conventions. Settle it once for each software package and each wholesaler, and state explicitly in the export file which size you are giving.
2. Grain direction
With woodgrain decors, the grain of side panels and partitions runs vertically, and that of shelves and top/bottom panels horizontally. The configurator has to assign a direction to every panel, otherwise the optimiser will rotate it for better board yield and a crosswise grain will appear on the front of the wardrobe.
3. Board format vs wardrobe size
A 2800 × 2070 mm sheet gives approx. 2780 mm of length after edge trimming. A 280 cm high wardrobe with a full-height side panel will not fit on the sheet. The configurator has to limit the height up front, add a top unit or switch the construction, rather than accept an order that cannot be cut.
4. Saw kerf and edge trimming
The saw takes a few millimetres with every cut, and the factory edges of a sheet are usually trimmed off. A generator that ignores this will calculate fewer sheets than needed, and a cut list that “fits” on paper will not fit on the saw.
5. Crooked walls in the alcove
The alcove dimension from the form is the customer's declaration, not a measurement. The configurator can quote the wardrobe straight away, but the production cut list should only be created after measuring, with installation clearance and filler strips matched to the difference in dimensions at several points.
6. Panel names and numbering
The twenty-five panels of one wardrobe look alike, and with several orders a day there are hundreds of them on the cart. Without a consistent name, order and module number on the label, the installer wastes time matching partitions to shelves.
7. Board offcuts
The fourth sheet in the example above leaves a sizeable piece of board. If the workshop keeps offcuts in stock, the optimiser can use them for subsequent orders in the same decor. This requires a simple offcut register, but with expensive decors it pays for itself quickly.
How to implement a cut list generator step by step
- Document the construction: how you join side panels to top/bottom panels, where the plinth goes, how far you set back shelves, what clearances you use. This knowledge usually lives in the designer's head and a few Excel spreadsheets.
- Write down the module rules: shelf spans, door leaves, depths, hardware. This is the same set of rules that drives the customer-facing configurator.
- Build the cut list generator for the two or three most common wardrobe types, not for all of them at once.
- Test the generator on 20 completed orders: compare the cut lists with those from your design software. Every difference is a missing rule.
- Add an export in the format your optimiser or wholesaler accepts.
- Only at the very end connect the price from the cutting plan to the quote or to margin control.
This scope can be wrapped up in an MVP in approx. 8 weeks if the construction is repeatable. We describe how much a complete configurator costs in the article How much does the configurator cost? Real ranges, and the decision whether to build your own or buy an off-the-shelf CPQ in the comparison custom configurator vs off-the-shelf CPQ vs template.
Frequently Asked Questions
Can a wardrobe configurator generate a cut list by itself?
Yes, if it knows the wardrobe construction: board thickness, joining method, plinth, clearances and the rules for splitting into modules. Then every change of dimension in the configurator immediately recalculates the sizes of the side panels, top and bottom panels, partitions and shelves, together with edge banding and grain direction.
In what format should panels be passed on for panel cutting?
Most often as CSV or XLSX with the columns: name, quantity, length, width, material, edge banding on each edge and grain direction. The column layout has to be adapted to the optimiser the workshop uses, or to the order form of the board wholesaler that cuts to order.
Will cutting optimisation in a configurator replace a professional optimiser?
It doesn't have to. The configurator should above all generate a correct cut list and estimate the number of sheets for the quote. Precise cutting optimisation, with offcuts and many orders at once, can still be done by the software the workshop already uses.
Is it better to price a made-to-measure wardrobe per m² or from the cutting plan?
For the customer, a simple price per square metre or per module is more convenient. For margin control, the cost from the cutting plan is better, because it shows the jumps: an extra module, an extra sheet, a more expensive decor that does not allow panels to be rotated. A combination of both works well: a per-m² price on the outside and the cutting plan in the company panel.
Can a configurator send data straight to a CNC machine?
It can prepare drilling data, i.e. holes for connectors, hinges and shelf supports, in the machine's program format or as a DXF drawing. This requires storing the full construction with hardware in the configurator, which is why it is usually done in a second phase, after the cut list and cutting plan have been implemented.
Next step
If you make made-to-measure wardrobes or built-ins and your designer spends hours retyping cut lists, send us one typical project with its cut list. We will tell you which rules can be captured in a configurator, what the export to your optimiser would look like and how much work the first version would take. Working examples, including the made-to-measure 3D wardrobe configurator and 3D table configurator, can be found in JSON Crew showroom.
Get in touch or see what a configurator implementation looks like, from the first conversation to a working MVP.
Read also
- Matrix price list vs formula: how to price a roller blind, insect screen or venetian blind in a configurator
- Configurator, CPQ and supplier catalogue: bidding architecture in non-series production
- How much does a configurator cost? Realistic price ranges and what influences the price
- ROI from the configurator: how to realistically calculate the return on investment
- Quotation Chaos in a Manufacturing Company: 7 Signs and How to Spot It